That wobbly, grinding sound from a suitcase wheel doesn't always spell disaster. Before you resign yourself to buying a whole new bag, take a few minutes to play detective. More often than not, the culprit is something simple you can fix yourself in less time than it takes to pack.
Your First Step in Luggage Wheel Repair
Resist the urge to immediately start ordering new parts online. The single most important first step is a quick diagnostic check. This simple once-over will tell you exactly what you're dealing with and can save you a ton of time and money.
After all, why go through the hassle of a full replacement when a good cleaning is all that’s needed? Most wheel problems boil down to one of three things: something is stuck, something is loose, or something is broken. Let's figure out which one it is.
Performing a Quick Visual Inspection
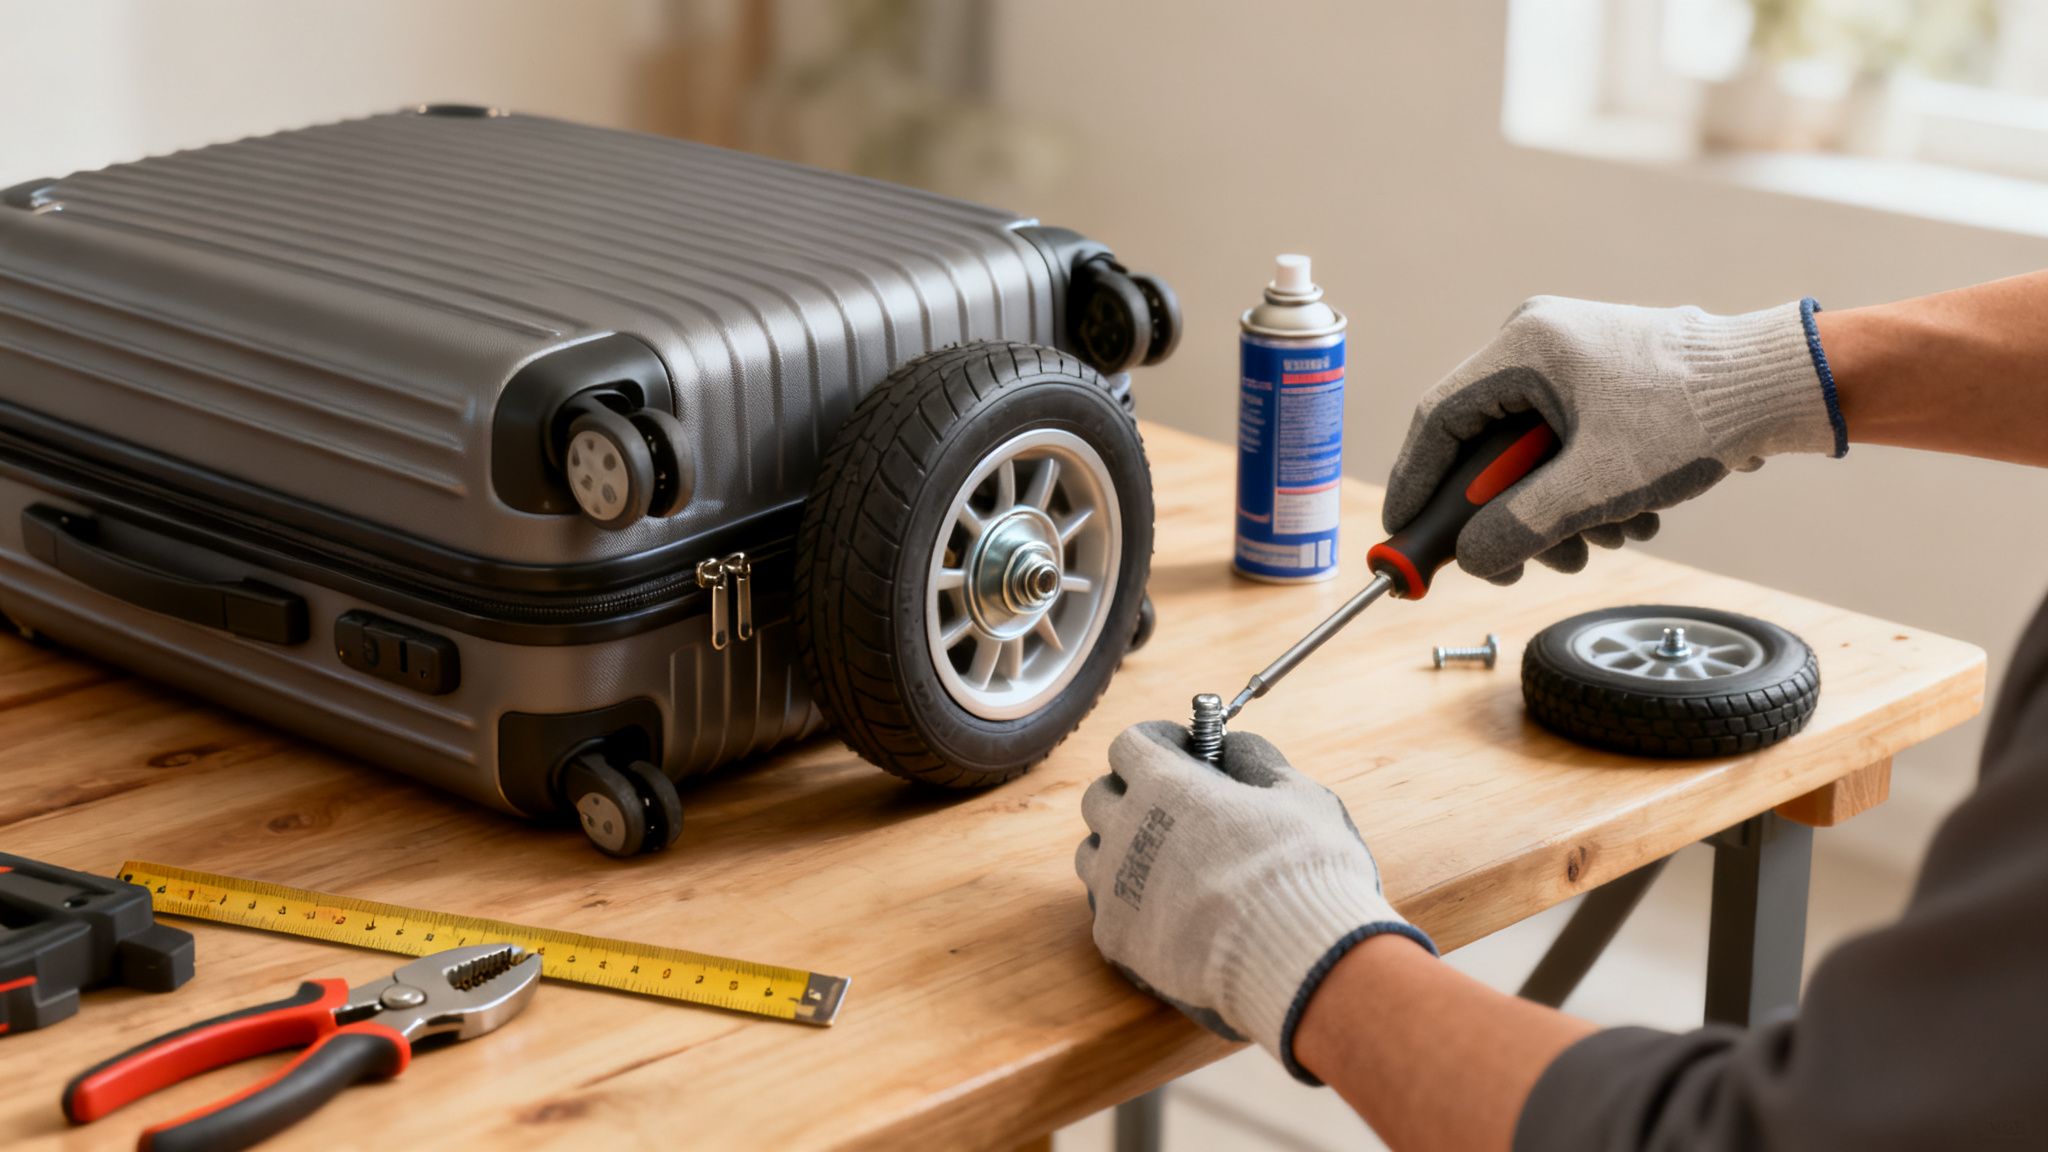
First, find a clean, well-lit spot and lay your suitcase down so you can get a good look at the wheels. Give each one a spin. Wiggle it side-to-side. Listen carefully. This little test will reveal a lot.
Here’s what to zero in on:
- Jammed with Gunk: The number one cause of a stuck wheel is debris. Hair, string, carpet fibers, and dirt love to wrap themselves around the axle. Look deep inside the wheel housing to see what’s gumming up the works.
- Loose Screws: All that rolling and bumping through airports can vibrate screws loose over time. Check every screw holding the wheel assembly to the bag. If you find one that's loose, you've likely found your wobble.
- Obvious Damage: Look closely at the wheel itself. Do you see any cracks, chunks missing, or flat spots from being dragged? Don't forget to check the plastic housing, too, as a fracture there is just as bad.
- Annoying Noises: If you hear a high-pitched squeak or a low grinding noise, the bearings are probably bone dry and crying out for some lubrication.
Pro Tip: Your phone's flashlight is your best friend here. Shine it directly into the wheel assembly. You’ll be shocked at how much lint and grime can get packed in there, completely jamming the mechanism.
Simple Fix or Full Replacement?
Once you’ve done your inspection, you'll know what to do next. If the wheel is just dirty or loose, you're in luck—that’s a fix you can probably handle in less than 15 minutes.
But if you found a cracked wheel or a broken housing, you’re looking at a replacement. It’s better to replace it now than have it fail completely mid-trip. Knowing what makes a quality bag in the first place can help you avoid these issues down the line; our guide on how to choose luggage is a great resource for that.
No matter the issue, we'll walk you through everything from basic cleaning to a full wheel swap.
Gathering the Right Tools and Parts
There's nothing more frustrating than getting halfway through a fix only to realize you don't have the right tool. Before you dive in, let's get your toolkit sorted out. Having everything you need laid out and ready to go will make this entire process quicker and a whole lot smoother.
The good news is that most of this stuff is probably already in your garage or that one junk drawer everyone has. This isn't a job that requires highly specialized equipment, but a few key items will save you from a major headache.
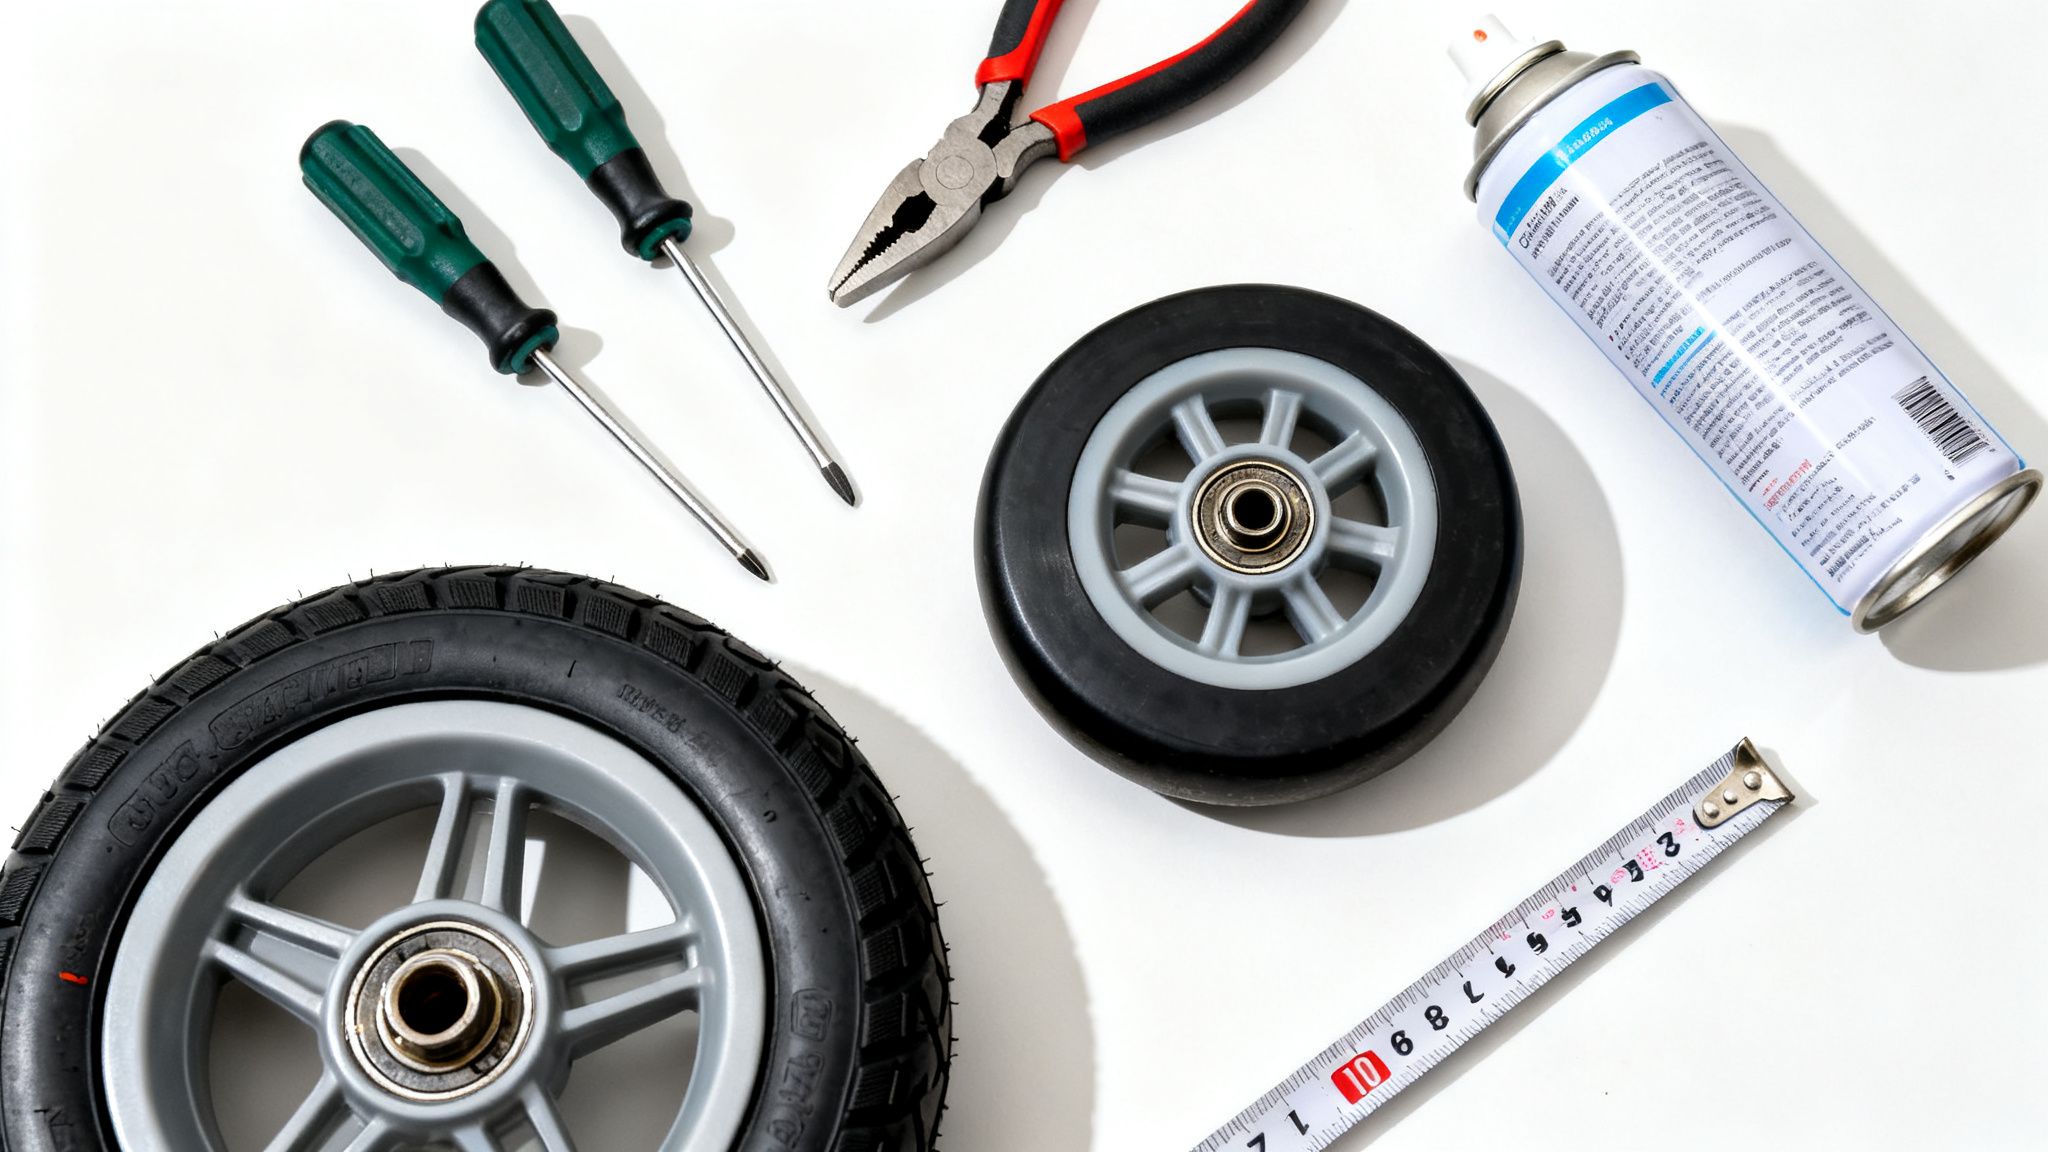
Your Essential Repair Toolkit
This is your mission control. You won't need a giant toolbox, but a few things are absolutely non-negotiable for everything from a simple cleaning to a full wheel replacement.
Here’s what you should grab:
- Screwdrivers: This is your most important tool. Most luggage wheels are held on with Phillips head screws, but you might run into flathead or even star-shaped Torx screws. A multi-bit screwdriver set is your best friend here. If you're not sure what you're looking at, it's worth checking out a guide to screw drive types.
- Pliers: A pair of needle-nose pliers will be invaluable for grabbing tiny parts, pulling out stubborn gunk, and holding nuts steady while you work.
- Silicone Lubricant Spray: Steer clear of WD-40. It’s an oil-based lubricant that will attract a ton of dirt and grime, making your problem worse down the line. A silicone-based spray is clean, won't harm the plastic, and works wonders on squeaky wheels.
- Measuring Tape or Ruler: This is absolutely critical if you need to order new wheels. Don't eyeball it—accuracy is everything.
You might also need a small hacksaw if you're dealing with a stubborn, non-removable axle, but we'll get to that later.
Finding the Perfect Replacement Wheels
So, you've figured out a wheel is cracked or totally busted. Time to find a replacement. Don't worry, this is much easier than it sounds, as long as you take careful measurements before you buy anything.
Start by removing one of the existing wheels from your suitcase. With the wheel in hand, you need to measure two things:
- Wheel Diameter: Measure straight across the center of the wheel, from edge to edge.
- Wheel Width: This is just the thickness of the wheel itself—the part that rolls on the ground.
Jot these numbers down in millimeters. Most online sellers use the metric system, so this will make your search much easier. It's also a good idea to measure the axle bolt's diameter and the total width of the wheel housing.
Insider Tip: Don't just search for "luggage wheels." I've found that inline skate wheels are an amazing and incredibly durable upgrade. They're often made with higher-quality polyurethane and have better bearings, giving you a much smoother, quieter roll that can easily outlast the originals.
With your measurements ready, you can hit up Amazon or specialized luggage repair sites. Replacement kits are great because they often include new axles, screws, and even little wrenches, giving you a complete package for the job. To get a better feel for different wheel types, check out our guide on https://voyageluggage.com/blogs/voyage/lightweight-luggage-with-spinner-wheels to see if an upgrade is the right move for you.
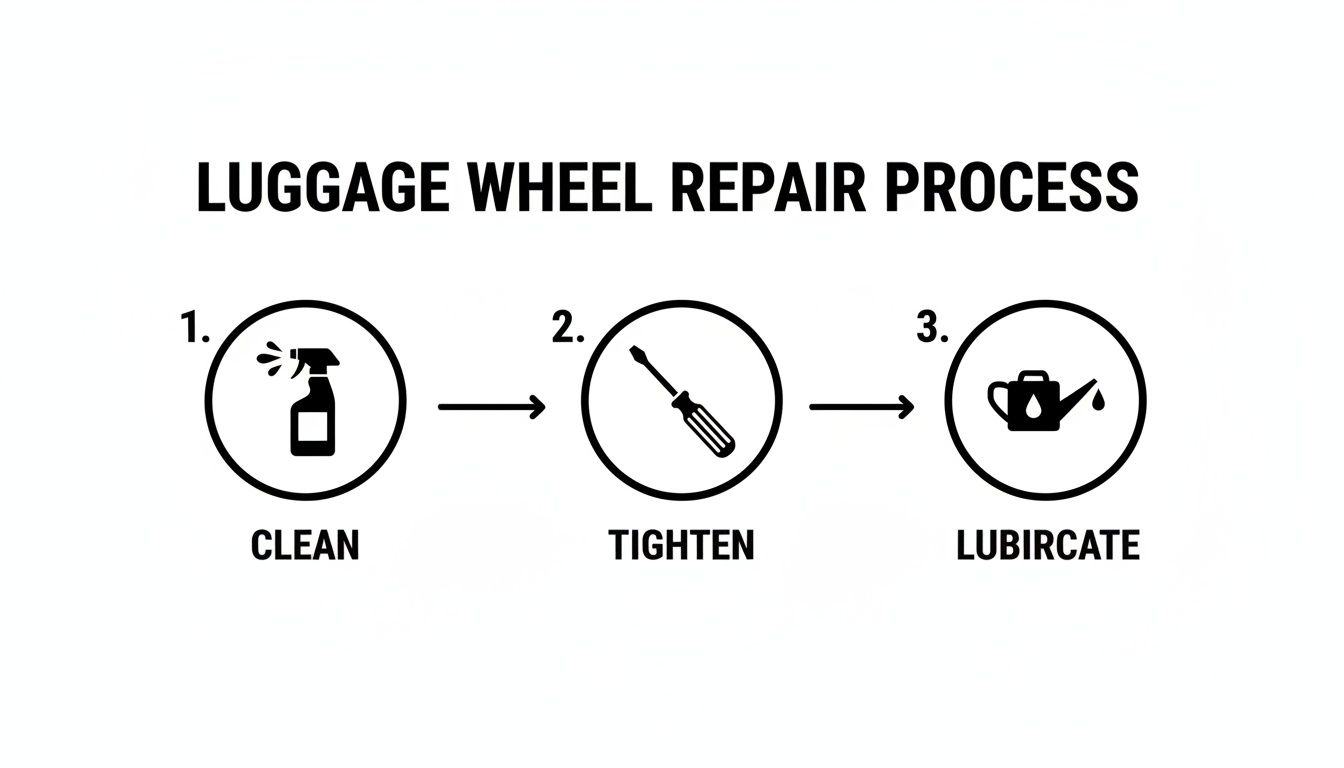
Getting Rid of Wobbly and Squeaky Wheels
A wobbly or squeaky wheel can turn a smooth airport glide into an absolute nightmare. But before you start shopping for a new suitcase, you should know that over 90% of these little annoyances are surprisingly easy fixes. Most of the time, all your luggage needs is a bit of attention to get back that silent, effortless roll it had on day one.
You don't need a pro-level workshop for this. With just a couple of common tools and a few minutes, you can solve the most frequent wheel issues—sticking, wobbling, and squeaking—right on your living room floor. Think of it as a quick pre-trip tune-up that will save you a world of frustration later.
The Deep Clean Your Wheels Are Crying Out For
Let's be honest: your luggage wheels have seen some things. They’ve rolled through countless miles of airport terminals, hotel carpets, and gritty city streets. All that travel means they’ve collected an impressive amount of hair, fibers, dust, and general gunk. This stuff gets tangled and compacted deep inside the axle, creating friction that makes your wheels stick, stutter, and eventually, just give up.
Here’s how to clear it all out:
- First, the big stuff. Grab a pair of tweezers or needle-nose pliers and start pulling out all the visible hair and string wrapped around the axle. It's amazing—and slightly gross—how much can get tangled in there.
- Time for a scrub. Next, get an old toothbrush, dip it in some soapy water, and give the wheel and the inside of its housing a good scrubbing. This will break up all the caked-on dirt and grime.
- The finishing blast. For a truly deep clean, a can of compressed air is your best friend. Aim the nozzle right at the axle and bearings and give it a few short blasts to blow out all the fine dust your brush couldn't reach.
Once you’re done, wipe everything down with a dry cloth and give the wheels a few good spins. You might be surprised to find that this simple cleaning is all it took to solve the problem.
Tightening Up Loose Wheel Housings
If a wheel is wobbling, the culprit often isn't the wheel itself but the housing that holds it onto the suitcase. The constant vibration from rolling over everything from smooth linoleum to bumpy cobblestones can cause the mounting screws to work themselves loose over time. This is a particularly common issue with four-wheeled spinner luggage, which takes a beating from all directions.
The fix is usually simple. Grab the right screwdriver—likely a Phillips or flathead—and check every screw on the wobbly wheel's housing. A screw that’s even just a quarter-turn loose is enough to create that annoying wobble.
Tighten each one until it’s snug. Just be careful not to crank on it too hard, as you could strip the screw or crack the plastic. You’re aiming for firm, not forced. Give the wheel a wiggle when you're done; chances are, the wobble will be gone.
A Traveler's Tip: Get into the habit of doing this before any big trip. It takes five minutes to flip your suitcase over and check that all the wheel screws are tight. This tiny bit of prevention can stop a minor wobble from turning into a catastrophic wheel failure halfway to your gate.
Lubrication: The Secret to a Silent Glide
That high-pitched squeal you hear every time the wheel turns? That's the sound of metal-on-metal friction. It’s your wheel's bearings screaming for lubrication. If you ignore it, you’re not only going to annoy everyone around you, but you're also causing premature wear that will destroy the wheel.
Using the right product here is critical.
- What you should use: A silicone-based lubricant spray. It dries clean, won't attract a bunch of new dirt, and is perfectly safe for the plastic and rubber parts of your luggage.
- What you should avoid: Steer clear of oil-based lubricants like WD-40. While it's a great product for other things, it leaves behind a sticky residue that’s a magnet for dust and gunk, landing you right back where you started.
To apply it, use the spray's little straw to aim a short, precise burst right at the axle and into the gaps around the bearings. You don't need to soak it. After spraying, spin the wheel by hand a few times to work the lubricant all the way into the mechanism.
Wipe off any excess with a clean cloth, and that’s it. The squeaking should be gone, replaced by that satisfying, silent roll. This one last touch can make even well-traveled luggage feel like new again.
Replacing Broken Luggage Wheels: Screws vs. Rivets
So, you've cleaned, tightened, and lubricated, but the wheel is still shot. Maybe it's cracked, completely worn down, or the housing itself has given up. When basic maintenance won't cut it, a full replacement is your next move. Don't worry, this sounds more daunting than it is. With a little patience, you can get your bag rolling smoothly again.
The whole job really boils down to one thing: how the wheels are attached. You'll find one of two setups—wheels held on by simple screws or wheels attached with permanent rivets. Each has its own game plan, but both are totally doable for a weekend repair.
Before you jump into a full-on replacement, remember the basics. A quick clean and tune-up can solve a surprising number of issues.
This process—clean, tighten, lubricate—should always be your first attempt before deciding a wheel is beyond saving.
To figure out what you're up against, take a look at the wheel housing. The fasteners holding it to the suitcase will tell you everything you need to know. This table breaks down the two main types you'll encounter.
Luggage Wheel Replacement at a Glance
| Feature | Screwed-In Wheels | Riveted Wheels |
|---|---|---|
| Identification | Visible screw heads (Phillips or flathead) on the housing. | Smooth, round, permanent metal fasteners with no slots. |
| Removal Method | Simple unscrewing with a screwdriver and pliers. | Requires drilling or sawing to remove the permanent rivets. |
| Difficulty | Easy. Perfect for beginners. | Moderate. Requires more tools and a bit of muscle. |
| Repair Time | 15-30 minutes | 30-60 minutes |
| Replacement | New assembly screws right back into the original holes. | New assembly is secured with nuts and bolts. |
Knowing which type you have from the start helps you gather the right tools and set aside enough time for the job.
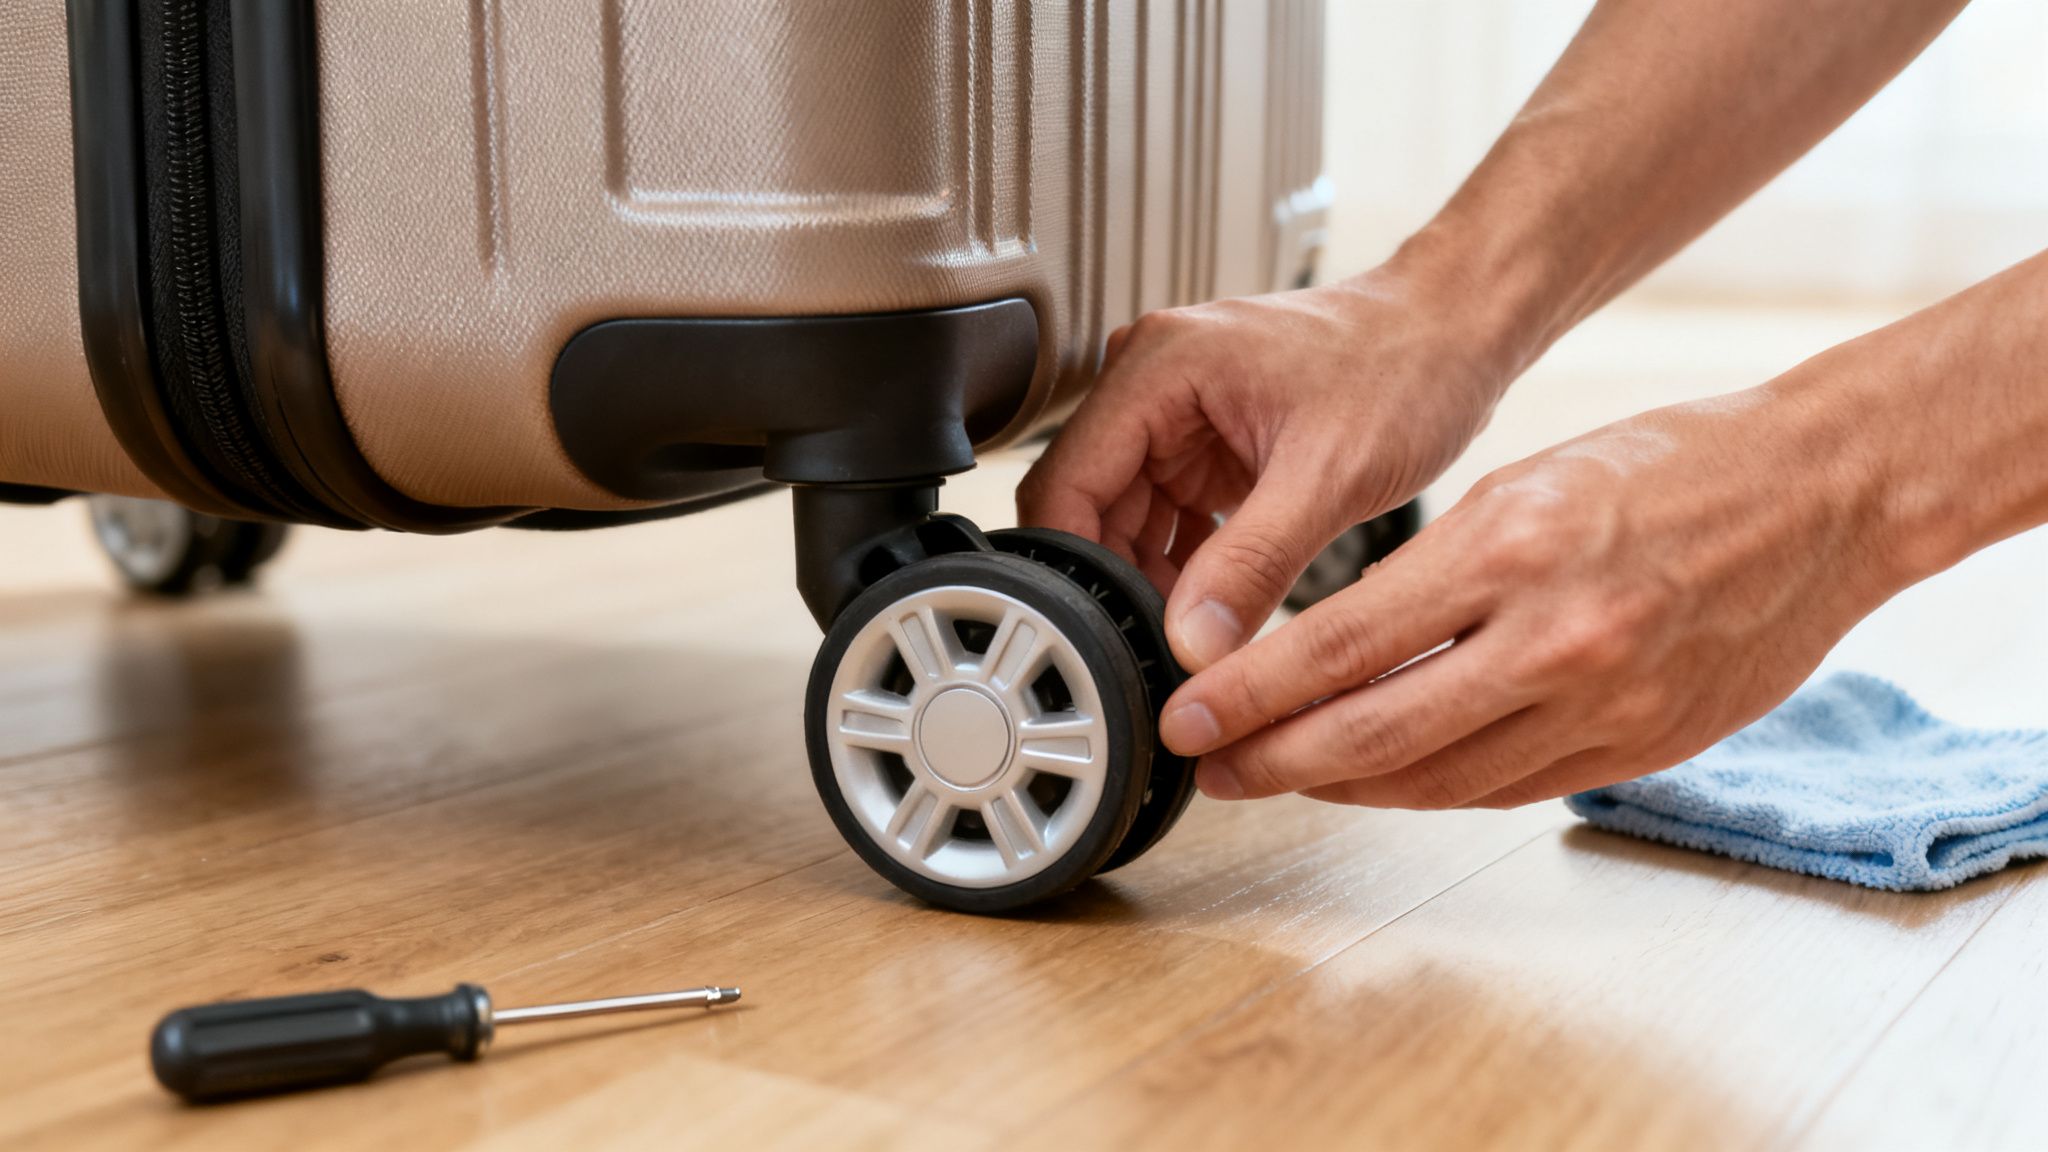
How to Replace Screwed-In Wheel Assemblies
If you spotted screw heads holding the wheel unit in place, you're in luck. This is the most straightforward luggage repair you can do, and you'll probably be done in under 30 minutes. The entire assembly, housing and all, is designed to come off as one piece.
First, open up the suitcase and unzip the liner to get to the inside of the wheel housing. You should see the screw ends, maybe with some nuts or washers on them. Grab your screwdriver and get to work removing them. If there are nuts on the inside, you'll need a pair of pliers to hold them still while you turn the screw from the outside.
Pro tip: Keep all the little screws, nuts, and washers in a small dish. You never know if you'll need to reuse the original hardware.
With the screws out, the old wheel assembly should pop right off. This is the perfect opportunity to wipe down the area before putting the new part on.
Just line up the new wheel assembly with the old screw holes. Pop the screws in from the inside and tighten them until the housing feels solid and doesn't move. Just be careful not to crank down too hard, as you could crack the plastic.
Tackling the Tricky Riveted Wheels
No screw heads in sight? Then you're dealing with rivets. These are meant to be permanent, so they require a bit more persuasion to remove. But here's the good news: once you get them off, you'll be replacing them with a much stronger nut-and-bolt system that’s easier to service down the road.
A drill is your best friend for this part of the job. The goal is to drill right through the center of the rivet to break it.
Here’s how to do it without damaging your bag:
- Pick the Right Bit. Grab a metal drill bit that’s about the same size as the little hole in the middle of the rivet head.
- Drill It Out. Set the tip of the bit in the rivet’s center dimple and drill with slow, steady pressure. You're trying to bore out the core, which will make the head pop right off.
- Push Out the Rest. After the head is gone, the rivet shank might still be stuck in the hole. A gentle tap with a small punch or even a screwdriver should push it right through.
Expert Tip: Sometimes a rivet will just spin in place when you try to drill it. If that happens, switch to a small hacksaw. Carefully cut a slot across the rivet head on the outside of the bag. Then you can use a flathead screwdriver to hold it steady while you drill from the inside.
Installing Your New Wheel with a Bolt System
Once the old riveted part is off, you’re ready for an upgrade. Installing the new wheel with nuts and bolts is not only a great fix but also makes future repairs much easier. Thinking about how a car's hub bearing vs wheel bearing work together can give you an appreciation for how these small but mighty components ensure a smooth ride.
Your replacement kit should come with the right size bolts, nuts, and washers.
Line up the new wheel assembly over the now-empty holes. From the outside, push a bolt through the housing and the suitcase wall. On the inside, slide a washer over the bolt and then thread on the nut. Do this for all the holes, but only tighten them by hand at first to make sure everything is aligned perfectly.
Once it's all lined up, use a screwdriver on the outside to keep the bolt from spinning while you tighten the nut on the inside with a wrench. You want it snug and secure.
For a truly bomb-proof repair, add a drop of thread-locking fluid (like Loctite) to the bolt threads before putting on the nut. This stuff is a lifesaver, as it prevents vibration from loosening the nuts over time—a common issue for well-traveled bags. Your fix will be solid for years to come.
Knowing When to Call a Professional
Fixing your own luggage is incredibly satisfying, but there are definitely times when the best move is to put down the screwdriver and call in an expert. The whole point is to get a reliable repair, and a DIY attempt on a serious issue can sometimes make things worse, costing you more down the road.
Knowing your limits is a big part of the game. A simple wheel swap is one thing, but if you're looking at structural damage to the suitcase itself, that’s a whole different story. Trying to patch a cracked shell or re-attach a wheel housing that's been torn out usually requires special tools and adhesives most of us don't have lying around the garage.
Red Flags That Signal You Need an Expert
Some problems just aren't meant for a home fix. If you spot any of the following, it’s a clear sign that a professional repair is your best and safest option. Forcing it on your own could end up compromising the entire suitcase.
Keep an eye out for these warning signs:
- Cracks in the Suitcase Body: If the hard shell around the wheel assembly is fractured, just bolting on a new wheel won't solve the underlying problem. A pro needs to handle that structural damage first.
- A Ripped-Out Wheel Housing: This is a big one. When a wheel gets torn completely from the bag, it usually takes a chunk of the suitcase material with it. This is way beyond a simple screw-in fix and needs a professional patch.
- Complex Integrated Systems: High-end brands like TUMI or Briggs & Riley often have proprietary wheel systems that you can't just buy online. Trying to force a generic part in there can permanently damage the unique mounting system.
- Warranty Concerns: Is your bag still under warranty? If so, doing the repair yourself will almost always void it. Always check the policy before you even think about opening your toolbox.
When you've invested in premium luggage, protecting that investment is the top priority. A professional repair not only gets the job done right but can also preserve the manufacturer's warranty—a key reason you bought a quality bag in the first place.
Doing the Math: Repair vs. Replace
So, what’s the final call? The big question often boils down to money. Does it make sense to pay for a professional repair, or should you just start shopping for a new suitcase? The answer really depends on what your luggage is worth.
If you're dealing with a budget-friendly bag that cost under $100, a professional repair rarely makes financial sense. The repair bill could easily be more than the price of a brand-new suitcase. In that scenario, give the DIY fix a shot—if it doesn’t work out, you haven’t lost much.
But for a premium suitcase that set you back $300, $500, or even more, the math looks very different. A professional wheel repair might run you $50 to $100, which is just a fraction of the replacement cost. Investing in a proper repair is a smart way to extend the life of your gear, making it a more economical and sustainable choice. A pro can also give you some pointers if the damage happened in transit; for more on that, check out our guide on what to do if your suitcase was damaged during a flight.
Still Have Questions About Fixing Your Luggage Wheels?
Even with the best instructions, you might still have a few things you're wondering about. When your travel plans are on the line, it’s always smart to get all the details straight before you pull out the tools. Let's tackle the most common questions I hear from travelers about fixing their luggage wheels.
My goal here is to give you quick, direct answers to clear up any final doubts. That way, you can get your bag rolling smoothly again with total confidence.
Can I Just Slap Any Replacement Wheels on There?
The short answer is a definite no. This is probably the number one mistake people make, and it’s an easy one to avoid. While a lot of wheels look the same at a glance, you absolutely have to match three key measurements: wheel diameter, wheel width, and the axle bolt diameter. If you get a wheel that's even a few millimeters too big, it’ll rub against the housing. Too small, and it just won't work right.
To nail the fit every time:
- Measure First, Buy Second: Always, always measure your old wheel in millimeters before you even think about ordering a replacement.
- Think About Upgrading: A lot of people have great success using inline skate wheels. They're often way more durable, but the same rule applies—you still have to match the size perfectly.
- Don't Forget the Axle: The new axle bolt has to be the same thickness as the old one. If it’s not, you'll end up with a wobbly, insecure wheel that's bound to fail.
You'll see "universal" kits for sale, but take that with a grain of salt. They aren't truly one-size-fits-all. They come with different spacers and axle lengths to cover common sizes, but they can't possibly account for every quirky luggage design out there.
How Can I Stop My Wheels from Breaking Again?
Honestly, a little preventative care goes a long, long way. Most busted wheels aren't just the fault of aggressive baggage handlers; they're often the result of simple neglect. A few minutes of maintenance here and there can seriously extend the life of your luggage.
Traveler's Insight: I like to think of my luggage like my car. It needs a quick check-up before a long trip. A simple 10-minute once-over can prevent a massive headache when you're rushing to catch a connection.
Before you head out, just run through this quick checklist:
- Clean them out. Grab some tweezers or a puff of compressed air to clear out all the hair, string, and gunk that gets wrapped around the axles.
- Tighten things up. Check the screws on the wheel housing. If they're loose, the whole assembly will wobble and put stress on the wheel.
- Lube the bearings. A quick shot of silicone lubricant keeps everything rolling smoothly and, as a bonus, quietly.
Is It Even Worth Fixing a Cheap Suitcase?
That’s a fair question, and it really just comes down to a bit of math. If you've got a suitcase that cost you less than $80, a DIY repair is probably the only option that makes financial sense. A replacement wheel kit will likely run you $15-$25, and you can knock out the job in under an hour. For that price, it's a great deal.
On the other hand, paying for a professional to fix a budget bag is rarely worth it. Once you factor in labor costs, you could easily spend more on the repair than the suitcase originally cost. My advice for cheaper luggage? See a broken wheel as a chance to try a DIY fix. If it works, you saved a bag from the landfill. If it doesn't, you're not out much.
What if I Can't Find the Exact Part for My Bag?
Hunting down an exact OEM (Original Equipment Manufacturer) part can feel like a wild goose chase, especially if your luggage is a few years old or from a lesser-known brand. When the company itself doesn't sell parts, you've still got some great options.
Online spots like Amazon and specialized luggage repair sites are your best friends here. They're loaded with third-party replacement kits. As long as you have your measurements right, you can almost always find a compatible part that will get the job done, even if it doesn't look exactly like the original. The key is to prioritize function over form—a high-quality wheel that fits correctly is way more important than a perfect cosmetic match.
Ready to invest in luggage that's built to last? At Voyage Luggage, we offer a curated selection of premium travel gear designed for durability and performance. Explore our collection of top-tier suitcases today.
Share:
Rolling: rolling underseat carry on — A Quick Guide to Effortless Travel
Finding the Best Luggage Lock for Secure Travel